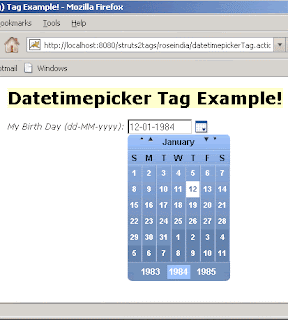
In this section, we are going to describe the datetimepicker tag. The datetimepicker tag is a UI tag that is used to render a date/time picker in a dropdown container. A stand-alone DateTimePicker widget that makes it easy to select a date/time or increment by week, month, and/or year.
It is possible to customize the user-visible formatting with either the 'formatLength' (long, short, medium or full) or 'displayFormat' attributes. By default current locale will be used.
Add the following code snippet into the struts.xml file.
struts.xml
Create an action class as shown:
includeTag.java
Create a jsp using the tag <s:datetimepicker> This tag renders a date/time picker in a dropdown container.
The tag <s:datetimepicker name="myBirthday" label="My Birth Day (dd-MM- yyyy)" displayFormat="dd-MM-yyyy" /> picks the data from the action class
"includeTag" using the parameter name="myBirthday" using the display format as displayFormat="dd-MM-yyyy".
datetimepickerTag.jsp
Output of the datetimepickerTag.jsp:
It is possible to customize the user-visible formatting with either the 'formatLength' (long, short, medium or full) or 'displayFormat' attributes. By default current locale will be used.
Add the following code snippet into the struts.xml file.
struts.xml
<action name="datetimepickerTag" class="net.struts2.includeTag">
   <result>/pages/uiTags/datetimepickerTag.jsp</result>
</action>
Create an action class as shown:
includeTag.java
package net.struts2;
import com.opensymphony.xwork2.ActionSupport;
import java.util.*;

public class includeTag extends ActionSupport {
  private Date myBirthday;
  public String execute() throws Exception{
  setMyBirthday(new Date("Jan 12, 1984 11:21:30 AM"));
  return SUCCESS;
  }
  public void setMyBirthday(Date date){
  this.myBirthday = date;
  }
  public Date getMyBirthday(){
  return myBirthday;
  }
}
Create a jsp using the tag <s:datetimepicker> This tag renders a date/time picker in a dropdown container.
The tag <s:datetimepicker name="myBirthday" label="My Birth Day (dd-MM- yyyy)" displayFormat="dd-MM-yyyy" /> picks the data from the action class
"includeTag" using the parameter name="myBirthday" using the display format as displayFormat="dd-MM-yyyy".
datetimepickerTag.jsp
<%@ taglib prefix="s" uri="/struts-tags" %>

<html>
  <head>
  <title>Datetimepicker (Form Tag) Tag Example!</title>
  <link href="<s:url value="/css/main.css"/>" rel="stylesheet"
  type="text/css"/>

  <s:head theme="ajax" />
  </head>
  <body>
  <h1><span style="background-color: #FFFFcc">Datetimepicker
    Tag Example!</span></h1>
  <s:datetimepicker name="myBirthday" label="My Birth Day
   (dd-MM-yyyy)" displayFormat="dd-MM-yyyy" />
  </body>
</html>
Output of the datetimepickerTag.jsp:
